Showing posts with label Stash Busters. Show all posts

February 22, 2020

Latest Project - Daisy in the Corner Granny Square

When you fall in love with a pattern you see shared on Facebook, you have to go buy the yarn to start it right away, no matter how many other projects you having going on, right?  That's a rule, right?  RIGHT?

The Daisy in the Corner pattern came across my feed and I was immediately hooked.  It's an easy pattern to follow, with a little bit of a spin on the traditional granny square.

I loved the way the designer made it with the two shades of two different colors, and wanted to somewhat replicate that, without being exactly those colors.  I had a tough time finding shades that would work, but finally settled on purples and oranges.  Not a combination I would ever have thought about previously, but I think it works ok. 


After looking at just these four squares, I think I might try joining them with all four daisies pointing towards the middle, instead of the same way at lower left.  I think that'll give it a completely different look, but will have to do the math and see if four blocks made into a larger block will work out for an appropriate length and width.  Look for that post soon.

I think this pattern is also a great way to use up scraps of yarn from your stash.  You could keep the center and daisy the same throughout, add bits of whatever colors you have for the portion around the daisy, then use a common color for the join.  It would end up being a very colorful, somewhat scrappy-with-a-pulled-together-look sorta afghan.  I think I'm going to save my scraps to do just that.

What's on your hook today?

~ Marie Anne


February 13, 2019

Easy Woven Look Baby Blanket - Free Crochet Pattern

This baby blanket is simple enough for a beginner, but pretty enough for gift giving. Worked in single crochet only, changing colors with each row makes the woven appearance even more unique. The simple stitch works up quickly, which more than compensates for the numerous color changes and weaving in so many ends.

I've used this stitch for a scarf pattern in a single color and decided to try using several colors for a different look in a blanket. As written, the pattern is worked in four colors, but would also make a good stash-buster project. Try using black or white as your main color and alternate every other row with whatever yarn scraps you have left in your stash.

This baby blanket pattern is provided free and may not be sold. You may sell the items you make from the pattern, but you may not sell the pattern itself.  You may print a copy for yourself, but if sharing with friends, please give them the link to this blog post.  Thanks for respecting my efforts to provide free patterns for you!

Skill Level - Beginner
Gauge - Not Important

Pattern Directions for Woven Look Baby Blanket

Abbreviations:

ch = chain
sc = single crochet
sk = skip
sp = space

Size I crochet hook and starting chain of 124 and worsted weight yarn should result in a blanket approximately 34" wide. To adjust the width, simply increase or decrease the starting chain in increments of two.

The colors I used for the blanket in the photo are:

MC (main color) = white
A = Lavender
B = Cornmeal
C = Honeydew

Pattern sequence will be one row of each color as follows:

A, MC, B, MC, A, MC, C, MC, repeating sequence until piece is desired length, ending with MC.

Foundation:  With size I hook and color A, ch 124.

Row 1: SC in second ch from hook, *ch 1, sk 1 ch, sc in next. Repeat from *, ending with sc in last ch. Leaving tail, cut yarn but do not bind off. Attach MC as indicated above, ch 2, turn.

Row 2: SC in first ch 1 sp, *ch 1, sc in next ch 1 sp. Repeat from *, ending with sc in turning ch. Leaving tail, cut yarn but do not bind off. Attach color B, chain 2, turn.

Repeat row 2 alternating colors each row as indicated above until you reach desired length. Bind off, weave in all ends. For a more finished look, add a simple sc border around the blanket, putting 3 sc stitches in each corner.

Choosing different color combinations can make each blanket truly unique, so don't be afraid to experiment.  Can't deal with weaving in all those tails?  Tie them off to make fringe!

Enjoy!

~ Marie Anne

P.S.  Make sure to check out my other free crochet patterns!


January 26, 2019

Hand Piecing Maniac

Ok, so I might be just a bit obsessed with this hand-piecing stuff.  I knew several weeks beforehand that the quilt along would be starting on January 21, but I started my own quilt top with the owl print first because I had watched all the videos on how to hand-piece and couldn't wait to put my new-found skills to the test.  I haven't finished the owl quilt yet, but since we'll only be doing one block each week for the QAL, I figured I'd have plenty of time to work on that in between the smaller blocks for the quilt along.

Well I got the first block done for the QAL just a few hours after it was introduced on Monday, and now I'm itching to do more.  I decided to go through my stash and see what else might match up to make another set of blocks like we're doing for the quilt along, and found these sorta ugly fabrics that I have no idea what else to do with.  Since the blocks are made up of fairly small pieces, maybe it won't look quite so ugly as they might in larger blocks, so I'm going to give it a go.


Here's the first block I made from two of the not-so-pretty fabrics.


The 9-week project for the QAL will result in a sampler size of about 23" x 23" or thereabouts. Since that's not very useful as a real quilt, I think I'll add some extra blocks to this set, and maybe it will be good enough for someone's man cave or something ... if the whole thing ends up being too horrid, I'm sure my dogs would love it.  Still beats sitting in my tubs of fabric stash for the last two years, right?

Do you ever find yourself becoming obsessed when you learn a new craft?  I can't be the only one, right?  RIGHT?

~ Marie Anne

August 15, 2018

Got the Hexie Bug Again

When I was clearing out boxes in the garage, I got all excited when I found my old English Paper Piecing (EPP) supplies.  I learned how to do it several years ago, but never put anything together to really make anything.  Wait, I did piece these poinsettia hexies to make a sort of table mat/runner, but I didn't finish it with a backing, or quilt it or anything.  I simply stitched them together and left the papers in for stiffness and called it good, LOL.  I used the 2 1/ 2" hexies for this.


Anyway, since I've been trying to learn piece/patchwork quilting, I've been accumulating scraps, and finding the old EPP stuff is giving me a new outlet to use them up.  I've cut templates and basted a bunch of 1"hexies the last two days, and anxious to see my pile grow so I can decide what I want to do with them.


Of course there's the standard layout for Grandmother's Flower Garden, and I might do some of those if I have six blocks of one color/pattern.  That will also be a good way to use up single hexies for the middle, where they might not work for anything else.


I also want to play with other  patterns, something with a group of same or similar color scheme hexies to make each grouping (each grouping different, though), with a group of solid/small pattern around each which will end up as sort of a sashing.  I didn't have enough of anything to get much of a trial layout, but this is something like what I had in mind.  I would probably use black, white, or a neutral color in place of the yellow.  


I love simple, no-brainer ways to keep my hands busy while watching TV, or sitting somewhere waiting for an appointment.  I can't stand to sit and do nothing, even riding in the car (with someone else driving).  I can keep a take-along bag of hexies that are ready to baste or hand piece together and just grab and go.  

Don't know if I'll ever be able to make a full quilt (that would take thousands of 1" hexies, and I plan to hand sew them all!), but I should be able to make some table runners, mug rugs, wall hangings, and maybe lap throws or baby quilts.  

Now I want to cut up all of my pretty fabric to make hexies, but I  need to stay focused on the mission to use up scraps, and not 'waste' my good fabric!  Stay tuned to see how successful I am with that mindset.  :)

~ Marie Anne

May 5, 2018

New Plan for Random Square Rag Quilt and Crumb or Crazy Quilt Blocks

I'm still loving playing with the small scraps of fabric to work on crumb quilt blocks, but since I don't have scraps from a lot of different fabrics right now, I'm sorta at a standstill.  I still haven't found my stupid cutting mats (but in all honesty, I haven't looked much lately) so can't do a lot of cutting for a regular rag quilt right now, but I still need a 'fix'.

It doesn't make sense to go buy fabric just to cut into small pieces for the crazy blocks, so I came up with another plan.  I do want to make a regular rag quilt out of random squares of different fabrics at some point (with each square a single fabric, but each block being different from the rest), so what I'm going to do is buy fat quarters on sale or with a coupon, and cut whatever regular size squares I can from those for the random squares quilt, and use the scrap remnants for the crumb quilt blocks.  I can use my scissors to cut the pieces large enough to make blocks with my rotary cutter and mat later, and still get the bits of scraps to use for the crumb-y squares now.  Win-win!

With that in mind and 60% and 40% coupons from Michael's in hand, another 40% in the Hobby Lobby app on my phone, off I went to see what I could drum up.

Here's what I found ...

Fat quarter bundle from Hobby Lobby
Two fat quarters from Michael's


Aren't they delicious?  I love all the bright colors, but this animal print really made me smile.


With these fabrics added to my current stash of scraps, I should have enough different prints and colors to make a few more crumb blocks now, and can use a coupon every time I hit Hobby Lobby (not sure how often Michael's coupons come out) to get more without breaking the bank.  I think I can afford to splurge for a dollar or two a couple of times a month.

Stay crafty ...

~ Marie Anne


May 1, 2018

Crazy Crumb Quilt Blocks in the Making

I posted the other day that I wanted to start making crumb quilt blocks, and so it begins!  I grabbed my stash of bits and pieces of remnants from various earlier projects and starting sewing them together in a random fashion.   It doesn't matter if the piece you start with is already fairly big, because once you sew it to another piece, you can trim that and make two (or more) pieces from it.  Then you piece those together with others, and just keeping adding and trimming until you have something large enough to square up into a block the size that you want.

I'm trying to put some pieces in a wonky direction just for a bit of interest, but I haven't done as much of that as I'd like, so will work on that more.  I need more fabric scraps with a variety of colors and patterns before I can go much further.  Here are a few examples of blocks I'm working on now.

No automatic alt text available.

No automatic alt text available.

No automatic alt text available.

No automatic alt text available.

Image may contain: indoor


You're supposed to do this completely random, but I had small pieces with a whole owl showing, and I couldn't not use them intact.  I figure they will be add a bit of whimsy to my finished piece.  Don't judge.  :)

I have no idea what my blocks will eventually be fashioned into, but I don't have to worry about that just yet.  It will take me time to build up enough of a stash to make the blocks random and not matchy-matchy, so I'll probably work on my crumb quilt blocks in between other projects.   Because of all the seams, I'll have to put a sashing border around them if I want to use them in a rag quilt, so I'm not sure if that will be my goal or not.  For now, I will just continue to build on them until I have enough to decide what size blocks I want to trim them into.

If you want to learn how to make crazy blocks like this, check out Darlene's crumb quilt block tutorials on youtube.  She has a whole series of various ways to make them.  (Word of caution:  she does throw in a word or two here and there that aren't fit for little ears, but very few, maybe 4-5 words in 10 videos.  The tutorials are worth it, IMO).

Someday I'll figure out how to do my own videos, but I will try to show as much as I can in photos here on the blog.  I'll do another post soon showing how you can take larger scraps and turn them into crumby pieces by stitching to other pieces then cutting.

~ Marie Anne

P.S.  This is one of the cutting mat and ruler sets that I have, and I love it!  Unfortunately, I have no idea where my mats and dquilting rulers are since moving.  I guess I should make finding them a priority.


April 28, 2018

A Crummy Idea - Crumb Quilt Blocks With Fabric Scraps


I posted yesterday that I might try to make a rag quilt out of random squares of scrap material, with no real rhyme or reason.  I asked sewing friends in a Facebook group for ideas on how to get past my need for order, and one suggested that I look up crumb quilts.

Ohmy. I found some youtube tutorials on how to make crumb quilt blocks, and I think I'm in love.  I now have a use for all of the tiny scraps that aren't big enough to make squares of their own!  When sorting fabric yesterday, I had thrown away a bag full of small scraps, but after a few minutes watching the videos, I went right out and grabbed that bag.  Yep, I did some dumpster diving right here at home.

I'm not sure yet how it will work out for rag quilting, though; since there will be so many seams in a single block, they might not rag well, but I'm going to play with it and see what happens.  If it doesn't work out as is, I might try to sew a strip of border around each piece, which would make the four sides more like a traditional block.  Worst case - if I can't use them to make rag quilts, I can make up the blocks and list them for sale, or donate them to someone who can use them in a traditional quilt. Either way, it'll be fun to play with all the colors and patterns and make something pretty out of scraps that can then be put to good use somehow instead of ending up in the garbage.

So today's agenda includes trying to make crumb quilt blocks.  But first ... did you notice anything in the photo above?  I knew right where my sewing machine was and got all excited to start, but something is missing.  In true MA fashion - I have no idea where the cord is!

~ Marie Anne


April 27, 2018

Random Scrap Rag Quilt Plans

After a whirlwind of listing house, selling house, driving from Ohio to NC, spending a couple of weeks in a hotel with two dogs, finding house, and closing on house all in a span of less than 60 days, I'm finally starting to settle in a little.  There's still a lot to do, but the house is livable and functional, and the rest will come together in time.

I've been working on my office/craft room, and anxious to get back to sewing rag quilts. I think I have everything arranged in here where I have room for my eBay stuff as well as a table for my sewing machine.   I spent quite a bit of time yesterday sorting my small fabric stash, found a few pieces that I'll offer for sale, put yardage in gallon sized plastic bags, and made a pile of scraps and remnants worth saving for a random quilt project.


I hate waste, but I also don't want to hang on to stuff that I'll never use, so I have a plan, and that plan is to not follow a plan, so to speak.

When I work on a layout for a rag quilt, I spend a lot of time working on placement of colors, patterns, etc, and need it to be 'just right'.  In order to use up my stash of scraps, I'll have to abandon that plan.

My new plan is to cut squares whenever I have a remnant come available and sandwich right away and toss into a tote to be stitched with other squares as soon as I have a few.  I figure if I just grab and go, stitch together whatever few squares I have done, I won't be able to stress about whether colors or patterns are right for each other. 

I think I'll cut squares in two different sizes to get the most use out of scrap fabrics.  Hmm .... if I do that, I might even attempt a square-on-square quilt which would make the randomness even more interesting.

Women have been making random quilts from clothing scraps for generations, right?  Can I?  Will I be able throw caution to the wind and work through my love of order to pull off a truly random scrappy quilt?  Stay tuned for updates!

~ Marie Anne


October 27, 2016

Stash Buster Round Dishcloth Crochet Pattern

Do you hoard save small amounts of yarn in your craft closet, hoping for the perfect opportunity to use them all up someday?  Guilty!  I crochet a lot of dishcloths and always have small amounts of cotton yarn left over, not enough to make another cloth with, but too much that I don't want to throw it out.  I tuck it away in a bag somewhere, knowing that someday it'll have a purpose.

I decided the other day that 'someday' had come, and I was going to figure out a way to use those bits of scrap yarn or it would meet the trash can after all.  I was going to make scrappy dishcloths, starting with one color until it ran out, then just grab another, not really caring how ridiculous it might end up looking.  I make square dishcloths in a back and forth pattern instead of in the round, so yea, they would be crazy, but still useful.

I thought about granny square-type dishcloths, but they have too many holes for me.  I then whipped up a solid granny and that worked out better, but I still wasn't satisfied.  I then searched for round dishcloth patterns, but none of the ones I found seemed to be 'the one'.  Then I remembered a star-like baby blanket pattern that I'd made before, and decided to see what would happen if I crocheted just the first few rounds of that.  BINGO!

What I started with is called the Rainbow Ripple Baby Blanket  which is a 12-pointed star pattern.  It doesn't really turn into a pointed star shape until much later into the pattern, but the first few rows make it just a little less plain than a straight (circular?) round shape, with 12 gentle peaks rather than points.  Because it's worked in the round rather than back and forth like my other favorite dishcloth patterns, the first rounds require very little yarn, then gradually requires slightly more yarn for each round.  It's a simple pattern too, strictly DC throughout, so even a beginner should be able to  make it.

You can make your dishcloths all one color, have the center two rows one color and the remaining rounds another color, solid color with just the last border round in a contrasting color, every round a different color - whatever suits your fancy (or the size of your scrap stash).  You could even just keep attaching the new yarn whenever you run out and not just at the end of a pattern round ... there are no rules!


I made a few dishcloths working the pattern through round 6 and a couple of them through round 7, and I personally like the smaller one better.  It's just the right size for me and doesn't stretch out too much when wet.  Oh, and I used a size G crochet hook so that the holes would be just a little smaller too.

I'm so glad that I didn't give up on my quest, and now have a use for the scraps of cotton yarn I've saved.  Do you save your small bits of yarn, or trash it all before your stash overtakes your life?

~ Marie Anne

October 3, 2016

Upcycled Blue Jean Denim Rag Quilt in Progress

I mentioned in an earlier post that I was going to be making a rag quilt and incorporating some blue jean denim fabric into it.  I found a really cool long flowered denim skirt and a pair of plus sized jeans in good condition at the thrift store, and after washing, made quick work of cutting into squares to use in my rag quilt.

I forgot to take a photo of the skirt by itself, but here are the jeans after I cut off the elastic waistband.  Don't ask me why I took the photo of them inside out, because I have no idea.  They're a really nice denim color, not faded at all (you can see it peeking out at the top).

Plus sized jeans ready to be cut into squares

The rag quilt that I'm working on now is going to be made with 6.5" squares, which will turn out to be 5.5" squares after ragging.  I was able to get 38 nice 6.5" squares from this one pair of plus size 28 jeans. I thought that was a good amount for my investment of $2.50!  When shopping the thrift stores, I try to pick out only the items that are 50% off for that day, and the original price of this pair of jeans was $4.99,  and for that amount of usable denim fabric, that's a very good deal.

Ended up getting 38 6.5" squares from that one pair of jeans

My original plan was to have the rag quilt completely reversible, with each square having the same front and back, but I didn't have enough of the other cotton fabrics (also reclaimed) to work out that way, so I adjusted.  Since most of the other fabrics had flowers, I decided to use the flowered denim squares on the front also, and go with all denim for the back.  I ended up with enough to do blocks of 7x9, so I need  63 squares for both top and bottom (and the flannel filling also).  I'll still need one more pair of jeans to have enough squares for the back.  I have five squares of the flowered denim left so I think I might put one in each corner and the middle square of the back, just for a little visual contrast, and to tie it in with the quilt top. Will wait until I get the rest of the squares for the back before I made the final decision.

Here's the final layout of the front of the rag quilt.  I can't wait to get the other jeans and finish cutting the back squares to I can get to stitching!  

Layout for the top of my reclaimed denim rag quilt

The other flowered and burgundy fabrics are from scrub tops - another thrift store find!

Do you recycle clothing or other items to use in your craft projects?

~ Marie Anne


August 21, 2014

More of My Latest Afghan Crochet Project

I posted the other day that I was crocheting an afghan for my niece and shared a swatch that showed some of the colors that I intended to work with, and I've since started the actual afghan  and have completed a full round of all colors I'll be using.  I'm anxious to see how it plays out as I add more rounds of color.


My version of "Leaping Stripes"
©Marie Anne St. Jean


I really like how this pattern looks and while it's very easy to do, it's a little more time consuming having to poke around and hunt for the stitches two rows below.  By working over the previous row of stitches, it also makes it a thicker, more stiff blanket, so I think if I do this pattern again, I'll use a larger hook and see if that makes it a bit softer and less rigid.  If you want a crochet project that resembles a woven blanket more than a lacy throw, this pattern has that covered.

The link to the pattern can be found in my original post.

I chose to make this afghan with four rows of each of five colors, with two rows of Aran between them.  I've also done swatches with just two rows of all colors and I like that look too, and that would be a great way to use up scrap yarn from your stash.

I'm also working on a baby blanket in Petal Pink, and that one will be listed for sale on Etsy, since I don't know anyone who is expecting a baby girl.  I need to get to work on one for the baby boy that my great-niece is expecting this fall.

What's on your hook?

~ Marie Anne

August 18, 2014

Latest Crochet Project - Full Sized Afghan

I'm making an afghan for my niece, whose spare bedroom will be done in Native American decor.  She wanted some neutral colors, but with a splash of maroon, and possibly blue or green worked in.  I picked what I thought were pretty colors that would work, and she agreed, and I then had to settle on a pattern.

I worked up a few swatches first and she loved the color choices in the one below but wanted wider stripes.  I do really like this one, so I'm shelving it for another project down the road.

©Marie Anne St. Jean


The above photo is made from the stitch that I used in my Waves of Color, but I alternated the color every row, with Aran between.


I then decided to try Leaping Stripes, a pattern I found on Ravelry, and because I think it resembles a woven blanket, thought it a good fit for a Native American theme.  I tried it a couple of different ways, varying the width of the stripes, and one swatch I did was with both the Aran and Cafe (beige and brown) between the other colors.  That seemed too neutral, so I tried two rows of Aran between every four rows of the other colors, and I think we have a winner.  I've only got the first rounds of Windsor Blue, Cafe, and Burgundy done so far, but I think it will really pop after I add the Sage and Carrot.

©Marie Anne St. Jean


I think both of the above swatches would also be a great way to use up all those scraps of yarn in your stash.  I love stashbusters!  I should get on the stick and write an article with my favorite stashbuster patterns.

~ Marie Anne

August 3, 2014

Circle in the Square Granny Square - New Link

I moved another of my free patterns to Examiner this morning, so make sure to bookmark the new link for Circle in the Square Granny Square.


I love this granny square made with white and one other color to make it pop.  You can choose to make just one color, or use up your yarn scraps to make squares with lots of bright colors that will really make a statement for a baby blanket or afghan.  It's a 6" square as written, but I'm sure you could adapt it to make it larger if needed.

I'll be making a new post here on the blog whenever I move one of my patterns to the new site, but to make sure you don't miss any of my craft articles, look at the top of the right sidebar and click to subscribe to get a notification when a new article is published on Examiner.

~ Marie Anne

February 6, 2014

Amazon gift card giveaway - Guess how many granny squares!

I've been trying to clean out some of my yarn stash so I've been busy making granny squares that I'll donate to Hands, Hearts, and Hugs - an organization I started a year or so ago that puts comfort-ghans together to send to people in need of a hug.  I've crocheted a good number of granny squares in the last three days, and it doesn't even look like I made a dent in my craft closet!


Do you want a chance to win a $5 Amazon.com gift card?  Make a guess as to how many granny squares I've made so far that are shown in the photo above.  You don't have to guess the correct number, but you do have to make a comment with your guess in order to be eligible to win. You can earn more entries by liking my Facebook Page, The Crooked Yarn, tweeting about the giveaway, and by visiting my Etsy shop.

The contest will run through midnight on February 20, 2014, and the winner will receive the code for the $5 Amazon gift card within 24 hours of contest end.  Entries from all countries are eligible to win, but the code will be for amazon.com and might not be able to be redeemed in all countries.

Enter now, and come back and get more entries for Tweeting every day!

~ Marie Anne

a Rafflecopter giveaway

March 25, 2013

Taming the Yarn Stash Monster

I know I'm not the only person to wield a crochet hook or knitting needle who has problems keeping my stash of yarn scraps straightened out, but I try to go through it every so often and attempt to make some semblance of order out of the chaos.  I did some of that yesterday, and hopefully will be completely finished today.

I've started many projects then put them aside to work on something else, and sometimes never get back to the original piece.  In the past I never kept any notes about things I was working on, and often the yarn used had been discontinued, or I don't know what size hook or what exact stitch I used, so it's useless to try to pick it back up again.  Here's a box with a bunch of partial skeins of yarn and several UFOs (unfinished objects) that I tackled yesterday.


This is a very big box so it doesn't look like there's much in there, but trust me, there was quite a bit.

I frogged and wound and frogged and wound until my arms were about to give out, and this is what I ended up with -- one bag of balls of yarn scraps, and a group of partial skeins sorta rolled up with a rubber band to keep them from getting tangled.


I still have two pieces to dismantle, but they can be neatly folded and put up until my  wrist and arm are more rested.

I need to finish going through the cubby where I have more yarn, but that's not in too much of a mess, so the rest should be pretty easy to sort and straighten out.  The bigger job will be to keep on top of it all and not let it reproduce.

How do you control your yarn stash?

~ Marie Anne


September 22, 2012

Baby Hat Day

With my first grandbaby on the way in November, I'm anxious to crochet some cute things for her (yes, she's a she!).  Baby blankets are a given as I have several different patterns that I like to crochet so she'll get more than one, I'm sure.  I'm hopeless at booties, and have only made one halfway decent baby sweater, so I thought I'd look to hats.

I made this little hat this morning out of Aran Fleck yarn, weaving a chain of black yarn that's then tied into a bow at the brim.  It's one of Bev's simple patterns and I could make a number of them from the leftover yarn I have in my stash, but my concern is sizing.  The finished measurements of this baby hat seems to be in line with charts I've seen, but I'd feel a lot better if I had an infant model to try them on.  I'd hate to send my son and his wife a half dozen hats in various colors and have none of them fit, ya know?

Do you have a favorite baby hat pattern that you know works out well for a newborn baby, and up to a few months old?  I'll be looking around at various pattern sites, but if you have a personal favorite, please leave a link in the comments and I'll check it out.

~ Marie Anne

May 11, 2012

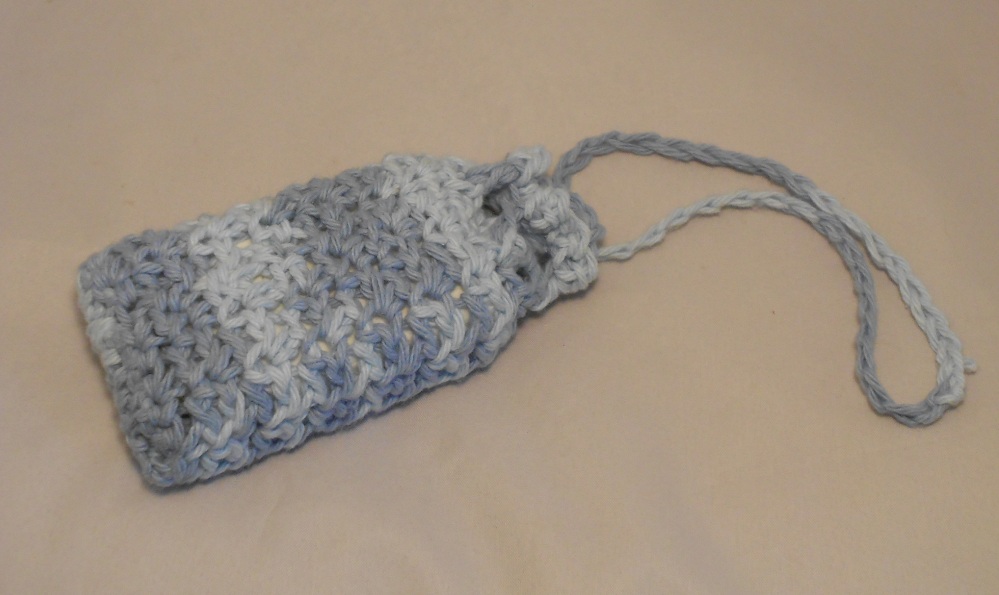
Soap Saver/Soap Sack Prototype

I'd often thought about crocheting soap savers or soap sacks, but never got a round tuit.  A friend asked me recently if I made them and I said no, but I'm sure I can, so I decided to give it a try.

After a few adjustments for size, this is what I came up with this morning. Whatdya think?

(Click photos to enlarge)


I'm going to use this one myself to see how I like it, if it stretches out too much, etc.  If it works out ok, I'll make up a mess of them to list on Etsy.  It's a great way to use up smaller bits of cotton yarn that aren't enough for a dishcloth.


March 27, 2012

Crochet Cell Phone Case

Doesn't everyone need a cell phone cover?

I do, because the one I had before doesn't fit the new cell phone I got a few months ago.  Rather than buy another one, I grabbed a crochet hook and some scrap yarn to see if I could whip something up.

It's my first attempt so still in the prototype stages, but I think I can make something out of it. Once I tweak it a bit, I'll probably list some for sale on Etsy, and can customize to fit the size of the individual buyer's cell phone.


I didn't make a buttonhole, so sorta forced it through the stitches to get it closed, but I can allow for that on my next attempt.


Next order of business will be to crochet covers for tablets and eReaders, so all of you Nook and Kindle enthusiasts who love to read eBooks, keep an eye out for something along those lines soon.


March 6, 2012

Hooking Up With an Old Friend

I finally got the craft room completely emptied to get the carpet put down in there, and I'm determined to clean out my junk stash before putting anything back in.  While sorting, I've come across projects I'd forgotten about - some I'll frog (take apart .. rip it, rip it), and some I might consider trying to finish.

December 14, 2011

More Dishcloths Means More Cotton Yarn

I'm still messing around with knit dishcloth patterns and haven't found 'the one' yet that I really like.  There are scads of free patterns out there, but many of them specifically say that they are for your own use and you can't sell what you make from the pattern.  Since I make dishcloths to sell on Etsy, it's hard to weed out those I can use and which patterns I can't.

I started this pattern perhaps a dozen times because I kept dropping stitches.  If I have a crochet hook handy I can pick them back up, but it always happened when I couldn't reach a hook, so I'd end up ripping out and starting again.  And again.  And ..


I finally finished it, but not without error.  Every other row is a straight knit row and somewhere I lost track of which row I was on when I ripped some out and picked up the stitches again, so there is a boo-boo.  Not real noticeable and certainly good enough for my own kitchen, so I let it go and finished it up.  I wanted to try this one out to see if I liked the hole-y-ness of it when used anyway.

Here's the same hole-y knit cloth with another simple knit pattern I tried in blue variegated.


I wanted to use up some of my stash of cotton yarn (wasn't that why I started this whole project again?), but saw some new colors out at WalMart and I couldn't help myself.  This cone of variegated greens, natural and teal jumped into my cart and begged to be taken off that overcrowded shelf.


I started first with a basic knit cloth but didn't like how the colors turned out, and was getting tired and aggravated anyway, so reverted to my standard crochet dishcloth pattern that I'm comfortable with.  I had this cloth completed in no time and have already started another in natural so I can get a set finished and listed on Etsy.  I can't believe how much longer it takes to knit than it does to crochet, and wondering again why I decided to pick up knitting needles.

I got one set of the standard granny cloths knitted in purples and sages listed the other day and they sold the same day, so I was pleased with that.  I've really got to get on the ball and get more things finished and listed;  I think I only have two sets of dishcloths up now.

Enough writing ... back to knit and crochet!


To play along on Work-in-Progress Wednesday, make your blog post for Wednesday be about something you're working on - some type of craft, renovation project, landscaping, even that novel you're writing. You can play along even if it’s not Wednesday; I leave each WIP up until the following week. Copy the code below Rosie's picture and paste it into your blog post so that others can follow too, and see the rest of the projects that are posted here.


Make sure to click 'You are next' below to add your link here so my readers can follow it to your blog post.

Note ** Several of you are signing up at the bottom but you’re not putting the WIP Wednesday link on your own blog. If you don’t, your readers won’t be led back here to see what others are doing and what WIP Wednesday is all about. It’s not hard, just copy the code beneath the photo above and paste it into your blog post. If you’re having trouble, please let me know and I’ll try to walk you through it.